MPU 6050 Sensor

This is a multi-sensor on a chip, made by various companies and used in various aspects including automotive applications. The 6050 has Thermometer, Accelerometer, and Gyroscope. They are used by DIYs in creating heli-drones, self balancing robots, self balancing 2-wheel "hover boards" and Segway Clones. Land, air and sea vehicles also use this or similar sensors for their navigation and position information. The amazing thing is its size - the board with some support electronics is about a 1in wide and half inch long (exact measurements are .80in/20.3mm wide X .62in/15.5mm long); the multi-sensor chip itself is quarter inch by quarter inch. There is a "sister-chip" called the MPU 9150 which includes a magnetic compass as well.
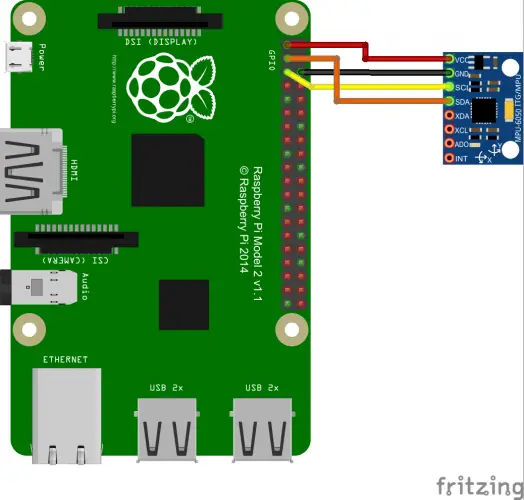
The MPU Sensor(s) use the I2C- Serial Communications Protocols to send and receive data to a host computer, in this case an Arduino or Raspberry Pi. In both cases, one has to upload the MPU 6000 Device Library to the Language Library of your host computer. If your computer does not have the I2C-Protocol Library, they have to be added as well. Using the I2C protocol, you reduce the number of connected wires from 8 to 3 (actually 5 but 2 are for Ground and Power, 3 are required the communicating to the device).

Drivers:
MPU6050:
http://www.hondosackett.com/yabb/R-Pis/MPU6050.zip I2C:
http://www.hondosackett.com/yabb/R-Pis/I2Cdev.zip Arduino Programming Example:
http://www.hondosackett.com/yabb/R-Pis/6050-IMU.zip Arduino:
https://playground.arduino.cc/Main/MPU-6050 https://maker.pro/arduino/tutorial/how-to-interface-arduino-and-the-mpu-6050-sen
sor

Raspberry Pi:
https://pypi.org/project/mpu6050-raspberrypi/ https://tutorials-raspberrypi.com/measuring-rotation-and-acceleration-raspberry-
pi/
Technical Information:
Reference Guide/Memory map (as .pdf download):
https://www.invensense.com/wp-content/uploads/2015/02/MPU-6000-Register-Map1.pdf
User Guide (as .pdf download):
https://www.invensense.com/wp-content/uploads/2015/02/MPU-6000-EV-Board1.pdf Datasheet (as .pdf download):
https://www.invensense.com/wp-content/uploads/2015/02/MPU-6000-Datasheet1.pdf The nice thing about this sensor beside its size is its cost. At the time I bought them (last year and forgot about them until I found them again a few days ago.), I bought 10 on ebay for about $10, or less than $1 each with free shipping. I find it cheaper to buy in bulk, especially with ebay. One unit by itself is about $2.50, which is still cheap if you were to buy each of the three sensors by themselves, that would cost anywhere from $6 to $15 total for all three sensors. I remember buying a set of passive thermometers a couple years before, which cost over $25 for a pack of 10. Another nice thing when compared to having 3 separate sensors as to this unit having all 3 in a neat little package is the amount of wiring has greatly reduced, and the number of GPIO pins are also reduced.
Programming is also a breeze using I2C with this multi-sensor, where with three separate sensors requiring different GPIO Inputs and thus three separate subroutines to access them one at a time. Under I2C, you set three different variables, one for each sensor and its respective program's subroutine request for the values of those sensors into the respective variable.
The one flaw I can see with this package is I do not think it is water proof. With the passive thermometers I mentioned before, they were water proof, sealed with a plastic wrap from the wires going to the physical sensor and about 3/4 down the length of the sensor's body, leaving the sensor's metal tip exposed to measure the temperature.
Tiny size, low price, 3 sensors in 1 package, ease of programming and ease of wiring are five major points to using such a sensor like this MPU 6050. I found the ones I have (and forgotten about) when I was looking for something to put into the CubeSat that I am building when I found the ten I ordered last year. In forgetting about them and founding them again, I found them to be perfect for the CubeSat project. The code to access the basic data from the sensor are in the links above along with what device driver libraries needed is linked within the linked webpages.
More research is needed to figure out the details, since the MPU 6050 uses I2C serial communications across the GPIO it can run in parallel with other devices and even other MPU 6050s. Using multiple MPU 6050 sensors one can refine the resolution of sensors output and if one sensor fails, there is still another set of sensor(s) to work with. But it does not end there; with other I2C sensor systems like the Pimoroni Enviro pHat and the Raspberry Pis Sense Hat. It can also talk to other I2C systems such as back up computational devices and radio communications equipment. Much of how the I2C is used on the system depends on the program(s) and devices connected to it.
What I find funny (particular funny, not "ha ha" funny), is that the MPU 6050 is 3-in-1 sensor module, and many places selling it (ebay, mouser.com, newark.com, etc) will say that it is a 3-in-1 sensor module: Gyroscope, Accelerometer and Thermometer, but the websites and the datasheets do not mention the Thermometer function at all. They would go in depth with the Gyroscope and Accelerometer, but nothing on the Thermometer. It is only in the Arduino and Raspberry Pi linked webpages is the thermometer mentioned and that is because it is in the sensor programming examples.
There is a problem with the MPU 6050 Sensor, which is pretty minor. These sensors are not calibrated and need to be calibrated to get them to read their sensors properly*. For Arduino, there is a small program you can run (download link here) which will give you calibration values to place onto your program; I am not aware if such a program exists for the Raspberry Pi but Im sure there is one. The Calibration program only takes about a minute to run to get the values for a particular sensor. Each sensor has to be calibrated individually, and the program accessing them must use the corresponding value to that sensor. Using another sensors calibration values will give incorrect readings. There are other options that includes adding the calibration program to main program, thus allowing on-the-fly calibration for a program to access before accessing the sensors. This calibration option being added is done in the very start of the main program and only accessed once.
Sensors outputs are metric: the Accelerometer is in meters/sec though it can be easily converted to ft/sec, The Gyroscope is degrees/sec. for angular motion. The Gyroscope can also measure position in degrees as well, if it is calibrated during initialization of the program to set a 0 degree position. In finding a second library set for the MPU 6050 sensor, there are more variables to access and calibrate, but at the same time, one of the programs connected to it does its own In-House calibrate upon start or reboot of the program in the hosts computer (in this case: Arduino). I have uploaded this second Library to the Arduino Library, and it does not conflict with the original MPU 6050 library. Download to this second MPU 6050 Library can be found here:
http://www.hondosackett.com/yabb/R-Pis/robojax-MPU6050_tockn-master.zip The Accelerometer can also be used as a Gyroscope when used in tandem with the Gyroscope when the Gyroscope starts to send erroneous measurements. Erroneous measurements made by the gyroscope when it is improperly calibrated. Though as stated the measurements are done in metric format, there is some math to convert the sensors raw data into useful information. The math is fairly simple but it uses trigonometry. The Arduino Programming Library already has basic trig functions built-in so there are no libraries to import when programming.
For what it is, this tiny sensor net does a lot.
Notes:
*At the time of this entrys writing (11/28), the Lion Airline 737 that crashed into the China Sea is being blamed on faulty sensors that were not calibrated as part of the airplanes maintenance routines. In researching this, there are many sensors out there used in aircraft, automotive, home appliances and so on that needs calibration before they can be used. Many times they just need to be calibrated once and that is all that is required for them to work properly. Other times a sensor needs to be recalibrated when it is disconnected from the host computer during maintenance or repair and then reconnected. Sensors that were replaced due to a parts repair do need calibration.


 Pages: 1


 M6050 Multi-Sensor on Arduino & Raspberry Pi (Read 396 times)


